Publishing RMarkdown Reports with Jekyll
methods 22 Feb 2022A major goal of this Open Notebook is to share my analyses with collaborators. I primarily use R and find RMarkdown an effective way to create reproducible code. However, sharing HTML files or PDF files back and forth over email is cumbersome, and prevents the use of dynamic applets. Toward this end, I have developed a reusable RMarkdown template that generates a Github Flavored markdown file which is converted to a Jekyll static page on my Open Notebook website.
Github Pages
Github pages allows the free hosting of static sites for personal websites and individual projects (repos). I further use Google Domains to register the patrickmkiel.com domain for $12 a year. I am then able to configure any subdomains, email forwards, and multiple Github Pages sites all for a reasonable price.
To setup Github pages, first create a repository with [username].github.io. Replace the [username] with your account’s username. For instance, my repo has the name pkiel.github.io. Commit some html files to this repo and then head over to https://username.github.io to see if it works.
Github provides excellent documentation on how to setup the custom domain names. Navigate to that link for a thorough step by step process.
Setting up a Jekyll Blog
Jekyll is a static website generator that uses Ruby and Liquid to easily develop blogs from Markdown files. You can host a Jekyll Blog on any capable server, but Github has the capabilities to compile Jekyll from within a repository, permitting the creation of blogs without needing to run a server or installing Ruby locally. There is an abundance of beautiful themes and ready to fork repos to quickly setup your own Jekyll blog. You may fork my notebook as a starting point, which I built by combining features from multiple blogs and themes that I liked.
I host my Jekyll blog on Github in a second repository different than my personal website. In depth steps of creating the Jekyll blog are available on the Github documentation. An important step if creating Jekyll in a second repository and wanting to leverage your domain is to correctly setup the _config.yml file. I want my notebook to be served at patrickmkiel.com/notebook so I set my config file as follows.
---
url:                 "https://patrickmkiel.com"
baseurl:             "/notebook"
---
Deploying RMarkdown Reports
Casting RMarkdown reports into an appropriate format to be correctly compiled requires a bit of work, but the heavy lifting has mostly been done by others and small changes to best fit your work flow and design is relatively simple. First, create a new folder labeled _source which will hold all of the Rmarkdown files. You can place this folder outside of your notebook repo, but I like to have them all together. If you place the Rmarkdown files in a different folder with the notebook repo, Jekyll is unable to build the static pages.
I name each of these files with the title I want to give the post without the normal YYYY-MM-DD- prefix required by Jekyl. I then set the YAML as follows:
---
layout: post
title:  "A nice title"
author: "My name"
date: '2022-02-22' #can change if you want to prescribe a manual date
categories: [methods] #list of comma separated categories or tags
description: "I like to give a nice description. I have this coded in to meta tags for each generated page for SEO optimization."
output:
  md_document:
    variant: gfm
    preserve_yaml: TRUE
knit: (function(inputFile, encoding) {
  rmarkdown::render(inputFile,
  encoding = encoding,
  output_file = paste0(Sys.Date(), "-",
                        gsub(pattern = "\\.Rmd$",
                              "", basename(inputFile))
                        ,".md"),
  output_dir = "../_posts") })
always_allow_html: true
---
The output_file argument appends the correct date format required by Jekyll to each post markdown file. The output_dir argument places the knitted file into the _posts folder.
In the setup chunk set the location to place generated figures and correct path based on how you have your blog setup. Since my notebook is a subdirectory of patrickmkiel.com, I include ‘/notebook/’ in the base_url. A caveat I am still trying to work out is that when I view individual markdown files on Github, I cannot see the plots. However, when I navigate to the page itself, plots show. This is an artifact of being a subdirectory and I am okay with it for now. Trying to leverage Liquid tags to make functionality work in both locations.
#load packages you want
library(tidyverse)

base_dir <- "~/Github/notebook/" # i.e. where the jekyll blog is on the hard drive.
base_url <- "/notebook/" # subdirectory of patrickmkiel.com
fig_path <- "images/" #folder that contains images of all generated plots

  # Set base directories
  knitr::opts_knit$set(base.dir = base_dir, base.url = base_url)

  # Set figure directories
  knitr::opts_chunk$set(fig.path = fig_path,
                      cache.path = '../cache/',
                      message=FALSE, warning=FALSE,
                      cache = FALSE)
I can create some code and it is viewable by others to see what I am doing. The kableExtra package creates beautiful tables
mtcars %>%
  group_by(cyl) %>%
  summarise(count = n(),
            `average MPG` = mean(mpg, na.rm = T),
            sd = sd(mpg, na.rm = T)) %>%
  kbl() %>%
  kable_material()
| cyl | count | average MPG | sd |
|---|---|---|---|
| 4 | 11 | 26.66364 | 4.509828 |
| 6 | 7 | 19.74286 | 1.453567 |
| 8 | 14 | 15.10000 | 2.560048 |
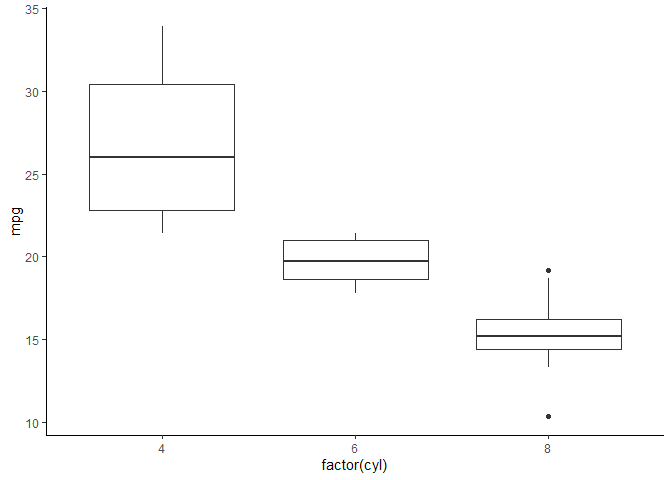
I can also allow you to see the code and generated figures.
mtcars %>%
  ggplot(aes(factor(cyl), mpg)) +
  geom_boxplot() +
  theme_classic()
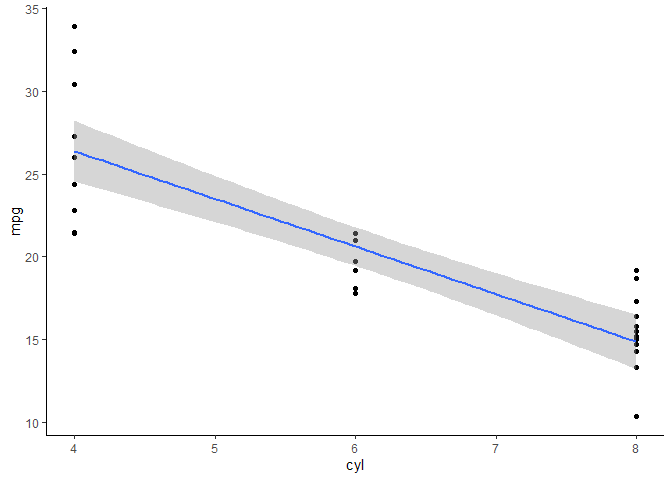
I can alternatively just output a figure without the underlying code.
Github pages unfortunately only allows client side code, precluding the use of Shiny apps. However, there are a few apps and even dashboards you can create using HTML widgets. A comprehensive listing of widgets and examples can be seen here. Further, you can add limited interaction with Crosstalk.
For example, here is an interactive map to visualize data.
To embed widgets requires some work. I first create a new code chunk with include set to FALSE so as not to run when compiling. I create the map and then save externally in my images folder. Finally, I import the widget as an iframe. This is required because of Jekyll and Github Pages messing with https protocols.
countries <- readOGR("https://rstudio.github.io/leaflet/json/countries.geojson")
map <- leaflet(countries) %>% addTiles()
qpal <- colorQuantile("RdYlBu", countries$gdp_md_est, n = 5)

map %>%
  addPolygons(stroke = FALSE, smoothFactor = 0.2, fillOpacity = 1,
    color = ~qpal(gdp_md_est)
  ) %>%
  addLegend("bottomright", pal = qpal, values = ~gdp_md_est,
            opacity = 1, title = "Est. GDP (2010)",
    labFormat = labelFormat(prefix = "$")) %>%
  saveWidget(here::here('images/', 'mapExample.html'))
<iframe src="/notebook/images/mapExample.html" height="600px" width="100%" style="border:none;"></iframe>